Getting to know your survey respondents a bit better is useful in practically any industry—knowing their age, income level, or favorite flavor of ice cream can add a ton of color and context to their responses. But if you’re surveying the same people more than once, you don’t want to have to ask the same people the same questions over and over again.
This is where Custom Data, a new addition to our Contacts feature, can help. It allows you to save this kind of important information about your respondents when you use our Email Invitation Collector to invite people to take your surveys. Plus, you can use this information to customize those invitations. Here’s how.
Adding Custom Data to your Contacts
In the past, you could keep only a single piece of information (not including First Name and Last Name) with a stored email contact. Now, each email contact has six fields where you can fill in extra information about your contacts, like demographics.
Adding Custom Data is really easy. Here’s how to do it:
- While you’re in Contacts, make a CSV file of your contacts.
- Open the file using Excel and add the Custom Data you’ve gathered in the columns adjacent to your contact info.
- Upload the new CSV back into Contacts and select update contact information.
Alternatively, you can add Custom Data to a single contact by simply clicking on an email address in Contacts and adding it from there.
Here’s an example of how you might use Custom Data. Let’s say you want to send a course evaluation survey to a group of students who are all enrolled in the same college course but have different professors and may have different majors.
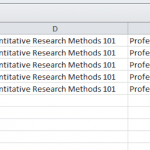
Custom Data will remember the course, the student’s major, and the student’s grade in the class—even if there are different professors teaching it. A CSV with this information ready to upload back into Contacts might look like this:

Use Custom Data to add a personal touch to messages
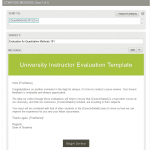
Here’s a bonus of collecting Custom Data: You can link the data with tags to streamline the process of customizing messages. Take this for example:

By using tags like in the example above, it becomes simple to personalize messages, which can seriously increase your response rate. The process is easy:
- Make sure Contacts has the appropriate Custom Data uploaded.
- While editing or composing your message, click where in the message you want to add the tag.
- Click Insert Custom Data and click the tag you’d like to add.
Now comes the fun part. Once you’ve gathered the custom data, you’ll be able to see that data along with the response when you export your data to an Excel spreadsheet. A little bit of Excel know-how can unlock tons of ways that you can isolate your data and gain deeper insights.
So there you have it! While these are just a few applicable examples, the possibilities of using Custom Data are vast. If you ever want to hear more about Custom Data, don’t hesitate to reach out to our top-notch Support Team. We’ll be thrilled to hear from you!
Got ideas for how you’re going to use Custom Data? Let us know in the Comments below!


